Lemon, honey and garlic fried chicken

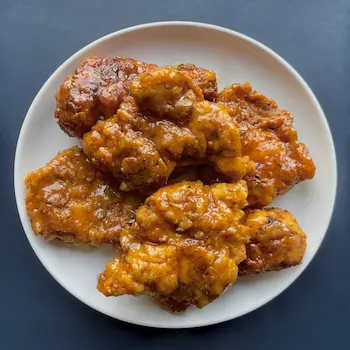
Crispy buttermilk fried chicken coated in a sweet and tangy honey, lemon and garlic butter.
Serve with steamed white rice, chips or roasted potatoes. Add a simple green salad, stir-fried greens like broccoli or a side of buttered grilled corn.
Ingredients
Fried chicken
- 6 large Chicken thighs, boneless and skinless
- 1 teaspoon Salt
- 1 teaspoon Ground black pepper
- 1 teaspoon Garlic powder
- 1 teaspoon Smoked paprika
- 150 millilitres Buttermilk
- 150 grams Plain flour
- 50 grams Cornflour
- Neutral oil, for frying
Sauce
- 1 tablespoon Unsalted butter
- 3 tablespoons Honey
- 2 tablespoons Lemon juice
- 1 tablespoon Light soy sauce
- 2 cloves Garlic
- 1 handful Fresh parsley
Instructions
Fried chicken
- Mix the chicken thighs with salt, pepper, garlic powder, paprika, and buttermilk.
- Cover and marinate in the fridge for at least 1 hour (but closer to 8 hours is best).
- Combine flour and cornflour in a bowl.
- Take each chicken thigh from the marinade, shake off excess liquid, and dredge well in the flour mix.
- Allow the dredged chicken to rest for 10-15 minutes.
- Heat the oil to 170°C in a deep pan. Fry the chicken in batches until golden and crispy (about 6–8 minutes).
- Drain and cool on a wire rack for 5 minutes (season with a pinch of salt while still hot).
Sauce
- In a large pan, melt the butter over low heat.
- Add the finely minced garlic and cook gently for 30 seconds until fragrant.
- Increase the heat to medium-low and stir in honey, lemon juice, soy sauce, and lemon juice. Let it bubble for about 1–2 minutes until slightly syrupy.
- Take the pan off the heat and stir in the chopped parsley.
- Toss the fried chicken in the sauce until evenly coated and serve immediately.
Helpful notes
Cooking tips
- Shake off excess marinade so the flour adheres in thin, uneven layers rather than clumping. This helps build a more craggy, crisp crust instead of a doughy coating. Press the flour firmly onto the chicken for better adhesion.
- Fry in batches to avoid crowding the pan resulting in the oil temperature dropping. This will lead to a greasy, soft coating instead of crisp frying.
- After coating, let the chicken rest for 10–15 minutes before frying. This allows the flour to hydrate slightly and bind to the surface, improving crust stability and reducing flaking during frying.
- Maintain 165–175°C throughout frying. If the oil drops below ~160°C, the coating absorbs oil instead of crisping; if it rises above 180°C, the outside darkens before the inside cooks.
- Cooking chicken with bone: This requires a longer cooking time so make sure you check its doneness. It can take roughly an additional 4 minutes.
- Cook the garlic over low heat to avoid burning it and turning the sauce bitter.
- Add the parsley at the end to retain its freshness.
- Let the fried chicken rest for a few minutes on a wire rack so the crust can fully set.
- Only toss chicken once sauce is slightly syrupy but still fluid. If it over-thickens, it will clump and soften the crust faster.
- Once the chicken goes into the sauce, toss it quickly and serve right away to keep the coating crisp under the sticky glaze.
Alternative ingredients
- Chicken breasts instead of thighs for a leaner option. Butterfly for the best result.
- Instead of buttermilk, other acidic ingredients can be added such as pickle juice, lemon or even yoghurt. The acidity in these ingredients helps to make the chicken more tender. If using eggs as a binder, add a touch of lemon or pickle juice.
- Cornflour can be omitted and replaced with an equal amount of plain flour, though this will result in a slightly less crisp coating.
Storage instructions
After frying, allow the chicken to cool completely on a wire rack to prevent it from becoming soggy from trapped steam. Store the chicken and sauce separately to prevent the chicken becoming soggy.
Refrigeration: The sauce can last in the fridge for up to a week. Store the fried chicken in an airtight container in the refrigerator for up to 3 days. If storing combined, it will last in the fridge for 3 days but eat as soon as possible for the best texture.
Freezer: For longer storage, you can only freeze the fried chicken. Place it on a baking sheet in a single layer to freeze first, then transfer it to a freezer-safe bag or airtight container. It can be kept in the freezer for up to 2 months.
Re-heating instructions
Oven: Preheat the oven to 190°C. Place the chicken on a baking sheet lined with parchment paper or a wire rack (this keeps it crisp). Bake for 10–15 minutes (or 20–25 minutes from frozen), flipping halfway through to ensure it crisps evenly.
Air fryer: For a quick and crispy reheat, use an air fryer at 180°C for 5–7 minutes (10–12 minutes from frozen). This will make the coating crisp again without drying out the chicken.
Stove: If the sauce has been stored separately, simply warm it in a small saucepan over low heat or in the microwave for 30 seconds to 1 minute, stirring occasionally to prevent burning.
Nutrition and dietary facts
Per serving:Calories: 530kcal (24%), Protein: 32g (53%), Fat: 24.3g (30%), Saturated fat: 6g (40%), Carbohydrates: 40g (15%), Sugars: 10.9g (44%), Fibre: 1g (3%)
NOTE: The nutritional information provided for this recipe is an estimate based on ingredients and cooking instructions as described - it is intended for informational purposes only.
Page contents
Featured in meal plans...
No linked meal plans...
View all meal plans